Preparation Step:
-Pastikan anda punya CD / File Installan Windows, saia ngga ngeshare disini
-Download Nlite : http://www.nliteos.com/
-Virtual PC bwt ngetes (optional)
-Software2 yg mau di tambahin ke windows installationnya
Step 1:
Browse ke Folder windows installation, kalau dari CD maka akan ditanya akan disimpan dimana filenya...
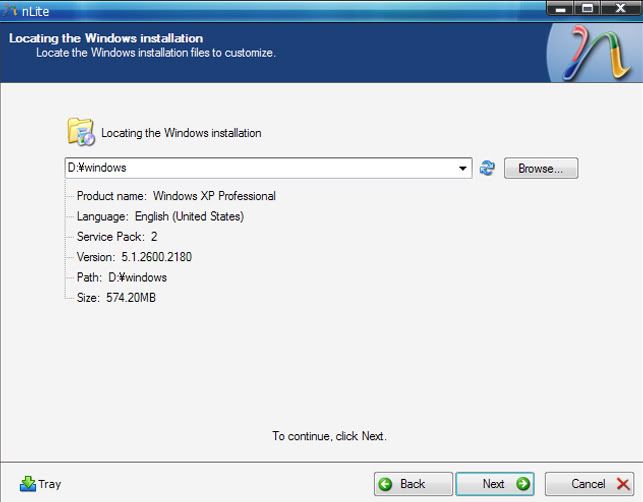
Disini saia pake Win XP SP 2
Next
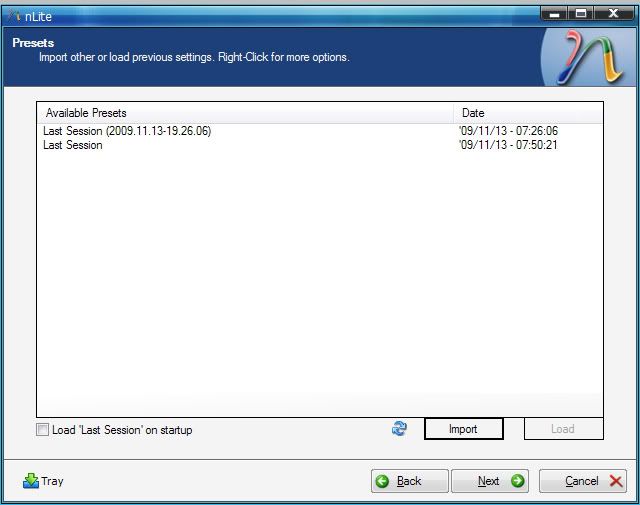
Step 2:
Layar Preset ( Settingan Nlite ) , kalau baru pertama kalinya, terobos aja...
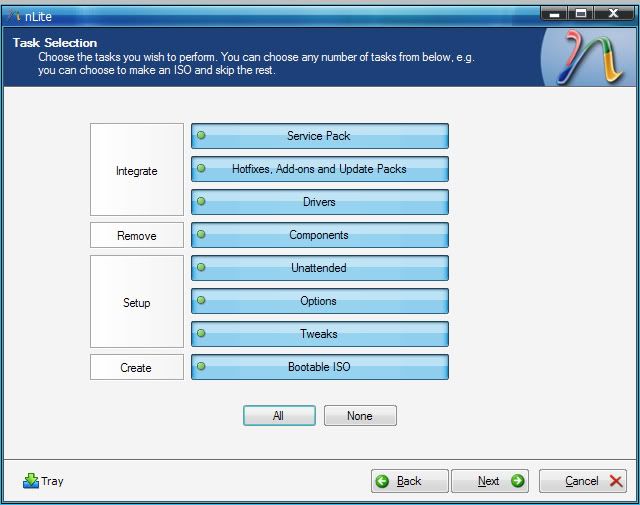
Step 3:
Klik di all, semua akan dicoba untuk kustom besar2an di sini
Step 4:
Slipstream Windows Service Pack disini...
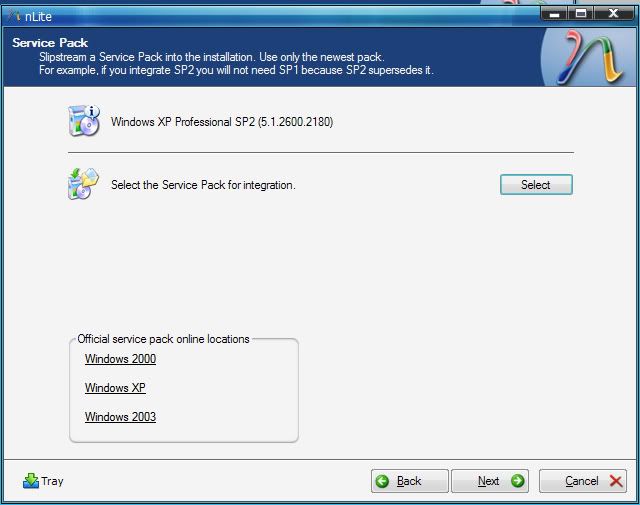
klik select n langsung aja browse ke file instalan SP3mu
Step 5a:
Integrasikan software n patch, sayangnya ngga bisa file exe dari installannya langsung ... harus dari bentuk .cab
harus diconvert dlu, untuk sementara software2 yg ready bisa di download di sini http://www.winaddons.com/nlite-addons

disini saia coba install firefox
Step 5b:
Integrate driver yg km perlukan, saia ngga perlu sih...
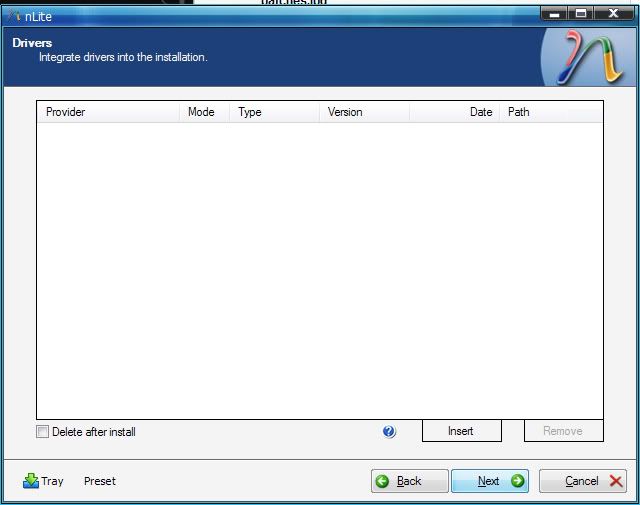
jadi next
Step 6:
Layar Components, saatnya buang yang ngga perlu
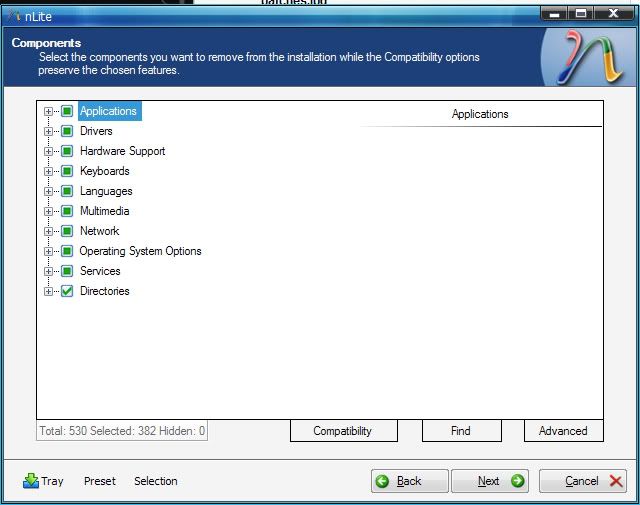
Kalau saia yg dibuang ini, tapi kreasikan sendiri sih kalau mau
Step 7:
Time to get Personal, Isi sendiri yah... keynya ngga saia kasih
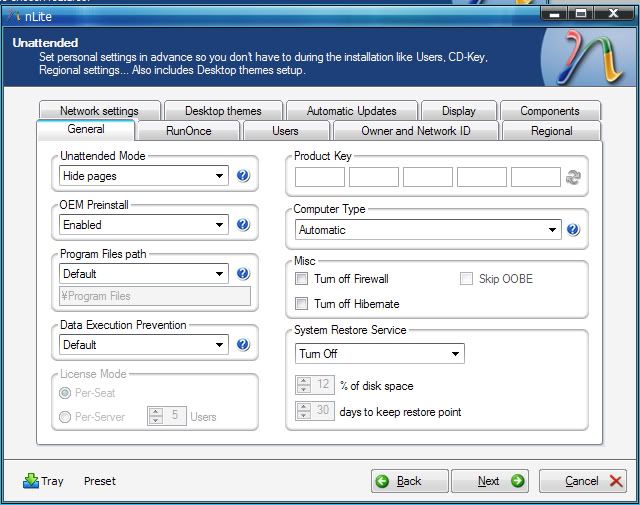
Dibagian Desktop Themes, add msstyles dari theme yg mau kamu integrasikan
Step 8:
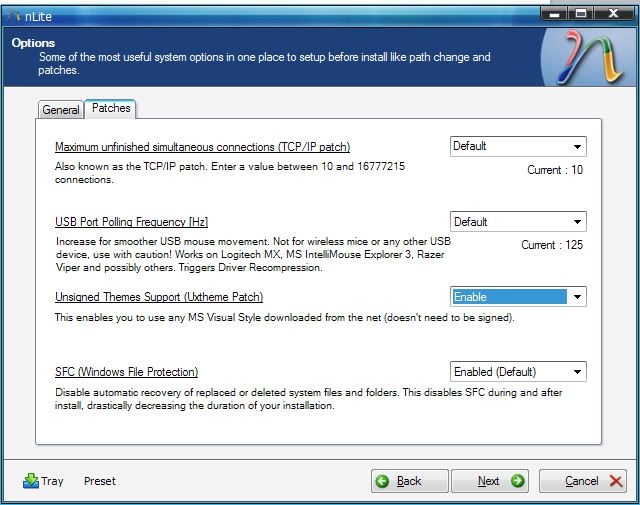
Bagian Ini yg penting cm di bagian patches,
pastikan enable di Uxtheme Patch kalau ngga theme yg tadi ga bakal ikut
Disable jg Windows SFC
Step 9:
Bagian Tweaks, centang terserah...
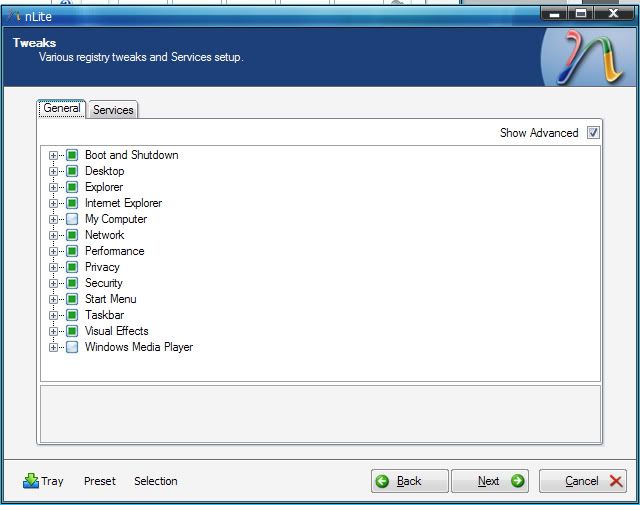
btw another nice performance, ikutin ini ajah iss:
iss:
Bagian services ngga usah diutak atik dlu
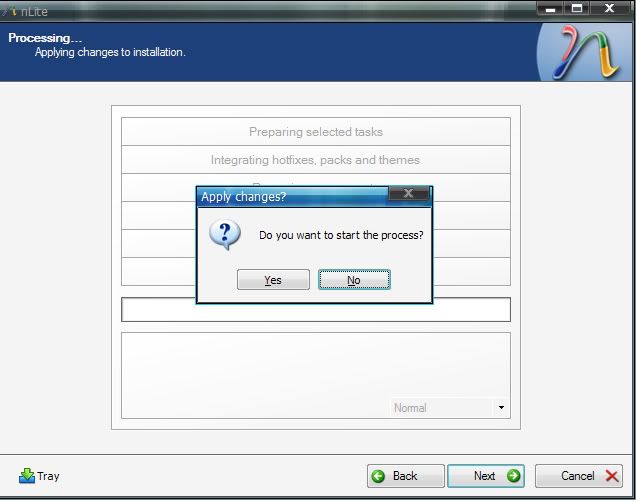
Step 10 :
Tinggal proses windows versimu
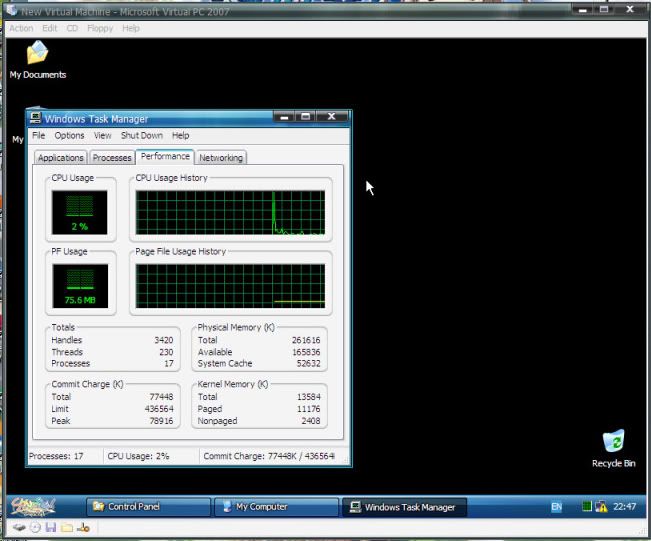
Step 11 :
Make Iso n burn, done
-Pastikan anda punya CD / File Installan Windows, saia ngga ngeshare disini
-Download Nlite : http://www.nliteos.com/
-Virtual PC bwt ngetes (optional)
-Software2 yg mau di tambahin ke windows installationnya
Step 1:
Browse ke Folder windows installation, kalau dari CD maka akan ditanya akan disimpan dimana filenya...
Disini saia pake Win XP SP 2
Next
Step 2:
Layar Preset ( Settingan Nlite ) , kalau baru pertama kalinya, terobos aja...
Step 3:
Klik di all, semua akan dicoba untuk kustom besar2an di sini
Step 4:
Slipstream Windows Service Pack disini...
klik select n langsung aja browse ke file instalan SP3mu
Step 5a:
Integrasikan software n patch, sayangnya ngga bisa file exe dari installannya langsung ... harus dari bentuk .cab
harus diconvert dlu, untuk sementara software2 yg ready bisa di download di sini http://www.winaddons.com/nlite-addons
disini saia coba install firefox
Step 5b:
Integrate driver yg km perlukan, saia ngga perlu sih...
jadi next
Step 6:
Layar Components, saatnya buang yang ngga perlu
Kalau saia yg dibuang ini, tapi kreasikan sendiri sih kalau mau
Spoiler untuk Components yg Ngga Perlu:
Really Nice Performance IMO 
Applications:
Briefcase
Games
Internet Games
Pinball
Screensavers
Drivers:
Asynchronous Transfer Mode (ATM)
Display Adapters
Display Adapters (old)
IBM PS/2 TrackPoint
IBM ThinkPad
ISDN
Logitech WingMan
Microsoft SideWinder
Modems
Multifunctional
Printers
Scanners
Serial Pen Tablet
Sony Jog Dial
Tape drives
Toshiba DVD decoder card
Hardware Support:
ATM Support
Brother Devices
Gravis Digital GamePort
Iomega Zip drive
Multi-port serial adapters
Ramdisk
Windows CE USB Host
Multimedia:
AOL ART Image Format Support
Images and Backgrounds
Intel Indeo codecs
Media Center
Mouse Cursors
Movie Maker
Music Samples
Old CDPlayer and Sound Recorder
Tablet PC
Windows Media Player
Windows Sounds
Network:
Client for Netware Networks
Communication tools
Comtrol Test Terminal Program
Connection Manager
FrontPage Extensions
H323 MSP
Internet Connection Wizard
Internet Information Services (IIS)
IP Conferencing
MSN Explorer
Netmeeting
NetShell Cmd-Tool
Network Diagnostic
Peer-to-Peer
Share Creation Wizard
Synchronization Manager
TAPI Application Support
Vector Graphics Rendering (VML)
Web Folders
Windows Messenger
Operating System Options:
NET Framework
Blaster/Nachi removal tool
Color Schemes
Desktop Cleanup Wizard
Document Templates
DR Watson
FAT to NTFS converter
File and Settings Wizard
File System Encryption
Help and Support
IExpress Wizard
Manual Install and Upgrade
MS Agent
MS XML 2.0
Out of Box Experience (OOBE)
Private Character Editor
Remote Installation Services (RIS)
Search Assistant
Security Center
Service Pack Messages
Symbolic Debugger (NTSD)
Tour
Web View
Services:
Application Layer Gateway
Error Reporting
Indexing Service
Messenger
Network DDE
Remote Registry
Removable Storage
Route Listening Service
RPC Locator
Service Advertising Protocol
Simple TCP/IP Services
Telnet
Directories:
DOCS
SUPPORT
VALUEADD
Step 7:
Time to get Personal, Isi sendiri yah... keynya ngga saia kasih
Dibagian Desktop Themes, add msstyles dari theme yg mau kamu integrasikan
Step 8:
Bagian Ini yg penting cm di bagian patches,
pastikan enable di Uxtheme Patch kalau ngga theme yg tadi ga bakal ikut
Disable jg Windows SFC
Step 9:
Bagian Tweaks, centang terserah...
btw another nice performance, ikutin ini ajah
iss:Spoiler untuk Tweaks:
Boot and Shutdown-Auto-End tasks immediately
Boot and Shutdown-Auto-Kill hung applications immediately
Boot and Shutdown-Auto-Kill hung services immediately
Boot and Shutdown-Ctrl-Alt-Del at logon-Disabled
Boot and Shutdown-Logon Page-Classic
Boot and Shutdown-Setup Prefetch-Cache-Disabled
Boot and Shutdown-Status Messages-Extended
Desktop-Desktop icons size-32
Desktop-Internet Explorer icon-Hide
Desktop-My Computer icon-Show
Desktop-My Documents icon-Show
Desktop-My Network Places icon-Hide
Desktop-Recycle Bin icon-Show
Explorer-Add (un)register libraries in Context Menu
Explorer-Add 'Command Prompt' to folder context menu
Explorer-Advanced Search: preconfigure options
Explorer-Associate additional file types with Notepad
Explorer-Change Windows Explorer folder view-Details
Explorer-Classic Control Panel
Explorer-Disable Accessibility keyboard shortcuts
Explorer-Disable Autorun
Explorer-Disable Prefix: Shortcut to
Explorer-Disable shortcut arrow
Explorer-Disable Web Files and Folders connection
Explorer-Display the contents of system folders
Explorer-Launch folder windows in a separate process
Explorer-Show Drive Letters in front of Drive Names
Explorer-Show extensions of known file-types
Explorer-Show hidden files and folders
Explorer-Show Map Network Drives buttons in Explorer bar
Explorer-Show Statusbar in all windows
Explorer-Show the full path in the Address Bar
Explorer-Show the full path in the Title Bar
Explorer-Use small icons in Explorer bar
Internet Explorer-Disable information bar when popup is blocked
Internet Explorer-Disable Market Place bookmark
Internet Explorer-Disable Media Player 6.4 created bookmarks
Internet Explorer-Disable Outlook Express link creation
Internet Explorer-Disable Password-Caching
Internet Explorer-Disable sound when popup is blocked
Internet Explorer-Enable Google URL-Search
Internet Explorer-Keep IE URL-History for-0 Days
Internet Explorer-Set Homepage-www.google.com
Internet Explorer-Set Internet Explorer to accept 10 connects at a time
Internet Explorer-Set popup-blocker to high
My Computer-Add Administrative Tools
My Computer-Add Control Panel
My Computer-Add Control Panel to Context Menu
My Computer-Add Device Manager to Context Menu
My Computer-Add Drive Cleanup to Context Menu
My Computer-Add Event Viewer to Context Menu
My Computer-Add Network Connections
My Computer-Add Registry Editor to Context Menu
My Computer-Add Scheduled Tasks
Network-Allow receiving Remote Assistance-Disable
Network-Disable restoring mapped network drives on logon
Performance-Disable Info Tips on Files and Folders
Performance-Disable Last accessed Timestamp on files
Performance-Disable Optimize harddisk when idle
Performance-Disable Tracking of Broken Shortcut Links
Performance-Disable WBEM logging
Performance-Do not cache thumbnails
Privacy-Disable Driver Update Internet prompt
Privacy-Disable File MRU-List
Privacy-Remove Alexa
Security-Always show Updates under Software
Security-Disable DCOM
Security-Disable Web Open With prompt
Security-Re-Enable userass URLs
Start Menu-Add Administrative Tools menu
Start Menu-Clear most recently opened documents list on logoff
Start Menu-Control Panel-Display as a menu
Start Menu-Disable and remove Documents list from the Start Menu
Start Menu-Disable Highlight newly installed programs
Start Menu-Do not use Personalized Menus
Start Menu-My Computer-Display as a menu
Start Menu-My Documents-Display as a menu
Start Menu-My Music-Don't display this item
Start Menu-My Network Places-Don't display this item
Start Menu-My Pictures-Don't display this item
Start Menu-Network Connections-Display as Connect to menu
Start Menu-Printers and Faxes-Display as a menu
Start Menu-Reduce popup delay
Start Menu-Remove Search For People from Search
Start Menu-Remove Search the Internet from Search
Start Menu-Remove Set Program Access and Defaults
Start Menu-Remove Windows Catalog shortcut
Start Menu-Scroll Programs
Start Menu-Use small icons in Start Panel
Taskbar-Disable Balloon Tips
Taskbar-Disable Group similar Taskbar buttons
Taskbar-Disable Hide inactive icons
Taskbar-Disable Language-Bar
Taskbar-Hide Volume Control Icon in System Tray
Taskbar-Lock the Taskbar-Yes
Visual Effects-Animate windows when minimizing and maximizing-Disable
Visual Effects-Menu animation-Disable
Visual Effects-Menu shadows-Disable
Visual Effects-Menu style-Flat
Visual Effects-Smooth edges of screen fonts-Clear Type
Boot and Shutdown-Auto-Kill hung applications immediately
Boot and Shutdown-Auto-Kill hung services immediately
Boot and Shutdown-Ctrl-Alt-Del at logon-Disabled
Boot and Shutdown-Logon Page-Classic
Boot and Shutdown-Setup Prefetch-Cache-Disabled
Boot and Shutdown-Status Messages-Extended
Desktop-Desktop icons size-32
Desktop-Internet Explorer icon-Hide
Desktop-My Computer icon-Show
Desktop-My Documents icon-Show
Desktop-My Network Places icon-Hide
Desktop-Recycle Bin icon-Show
Explorer-Add (un)register libraries in Context Menu
Explorer-Add 'Command Prompt' to folder context menu
Explorer-Advanced Search: preconfigure options
Explorer-Associate additional file types with Notepad
Explorer-Change Windows Explorer folder view-Details
Explorer-Classic Control Panel
Explorer-Disable Accessibility keyboard shortcuts
Explorer-Disable Autorun
Explorer-Disable Prefix: Shortcut to
Explorer-Disable shortcut arrow
Explorer-Disable Web Files and Folders connection
Explorer-Display the contents of system folders
Explorer-Launch folder windows in a separate process
Explorer-Show Drive Letters in front of Drive Names
Explorer-Show extensions of known file-types
Explorer-Show hidden files and folders
Explorer-Show Map Network Drives buttons in Explorer bar
Explorer-Show Statusbar in all windows
Explorer-Show the full path in the Address Bar
Explorer-Show the full path in the Title Bar
Explorer-Use small icons in Explorer bar
Internet Explorer-Disable information bar when popup is blocked
Internet Explorer-Disable Market Place bookmark
Internet Explorer-Disable Media Player 6.4 created bookmarks
Internet Explorer-Disable Outlook Express link creation
Internet Explorer-Disable Password-Caching
Internet Explorer-Disable sound when popup is blocked
Internet Explorer-Enable Google URL-Search
Internet Explorer-Keep IE URL-History for-0 Days
Internet Explorer-Set Homepage-www.google.com
Internet Explorer-Set Internet Explorer to accept 10 connects at a time
Internet Explorer-Set popup-blocker to high
My Computer-Add Administrative Tools
My Computer-Add Control Panel
My Computer-Add Control Panel to Context Menu
My Computer-Add Device Manager to Context Menu
My Computer-Add Drive Cleanup to Context Menu
My Computer-Add Event Viewer to Context Menu
My Computer-Add Network Connections
My Computer-Add Registry Editor to Context Menu
My Computer-Add Scheduled Tasks
Network-Allow receiving Remote Assistance-Disable
Network-Disable restoring mapped network drives on logon
Performance-Disable Info Tips on Files and Folders
Performance-Disable Last accessed Timestamp on files
Performance-Disable Optimize harddisk when idle
Performance-Disable Tracking of Broken Shortcut Links
Performance-Disable WBEM logging
Performance-Do not cache thumbnails
Privacy-Disable Driver Update Internet prompt
Privacy-Disable File MRU-List
Privacy-Remove Alexa
Security-Always show Updates under Software
Security-Disable DCOM
Security-Disable Web Open With prompt
Security-Re-Enable user
ass URLsStart Menu-Add Administrative Tools menu
Start Menu-Clear most recently opened documents list on logoff
Start Menu-Control Panel-Display as a menu
Start Menu-Disable and remove Documents list from the Start Menu
Start Menu-Disable Highlight newly installed programs
Start Menu-Do not use Personalized Menus
Start Menu-My Computer-Display as a menu
Start Menu-My Documents-Display as a menu
Start Menu-My Music-Don't display this item
Start Menu-My Network Places-Don't display this item
Start Menu-My Pictures-Don't display this item
Start Menu-Network Connections-Display as Connect to menu
Start Menu-Printers and Faxes-Display as a menu
Start Menu-Reduce popup delay
Start Menu-Remove Search For People from Search
Start Menu-Remove Search the Internet from Search
Start Menu-Remove Set Program Access and Defaults
Start Menu-Remove Windows Catalog shortcut
Start Menu-Scroll Programs
Start Menu-Use small icons in Start Panel
Taskbar-Disable Balloon Tips
Taskbar-Disable Group similar Taskbar buttons
Taskbar-Disable Hide inactive icons
Taskbar-Disable Language-Bar
Taskbar-Hide Volume Control Icon in System Tray
Taskbar-Lock the Taskbar-Yes
Visual Effects-Animate windows when minimizing and maximizing-Disable
Visual Effects-Menu animation-Disable
Visual Effects-Menu shadows-Disable
Visual Effects-Menu style-Flat
Visual Effects-Smooth edges of screen fonts-Clear Type
Bagian services ngga usah diutak atik dlu
Step 10 :
Tinggal proses windows versimu
Step 11 :
Make Iso n burn, done
Spoiler untuk hasil kreasi saia:


 Gratisan Musik


0 komentar:
Posting Komentar
Kalau Comment Jangan Junk Ya